Dynamic Camera System Documentation


Disclaimer
This is a compilation of my findings and work while learning to program. Not everything used is standard or a proper method of implementation. My hopes for this is that other people curious about using CineMachine can use this as a reference for different ways of using the software.
Summary
This Devlog will entail documentation about my experience and growth of implementing a camera system with CineMachine on Unity along with my intent behind it. I'll walk through my decision process, steps I took, and the results I came up with.
Intent
Starting off with intentions, this takes place in a 3D game environment where the player camera is in the third person. They should be able to have multiple states that effect the camera and there are three states I will go over in this document.
- Freelook: The player has the ability to look around freely in this state. Example: Player is exploring the overworld and can look wherever they like with the player always in sight.
- Specific Entity Targeting: The player should have the ability to swap between specific set targets. Example: If a player is in a boss fight and they have to swap between multiple set targets like the heads of a hydra.
- Multi-Entity Targeting: The player should be able to lock-on to enemies within range of them, and choose which they're locked onto if there are multiple. Example: You encounter a monster and initiate combat with it, when it gets within your range you're able to lock-on to it and any other close by monsters.
Startup
The first thing I did was create a new unity project and set up a source tree repository, and installed CineMachine to the project. I then decided it's important for me to have a clear picture of the first thing I wanted to accomplish, so I made a very basic sketch in illustrator to base my first task off of.
The first step was to familiarize myself with Cinemachine to get an idea of how it would operate. and I decided to do that by setting up the basic function of Cinemachine which is 'Follow' and 'Look At'. I did this by placing a plane and setting up an object to be the player and an object to be the focus.
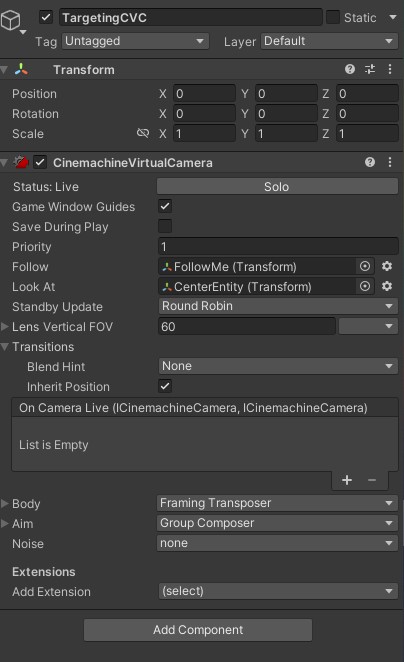
After setting that up I determined which settings best suited what I was looking for, I found that putting an empty game object inside of the player model, and positioning it slightly above created a better effect that making the player model the target directly. That object is called "FollowMe", while the target is called "CenterEntity".
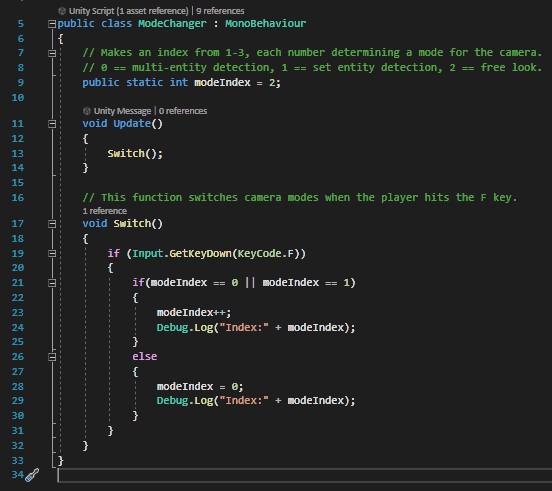
After this I felt it was important to set up mode switching functionality, in which I can swap between the three camera states. I did this in a very simple script called ModeChanger using a static variable that changes between 0, 1, and 2 when the player clicks the 'F' key.
Part One: Freelook
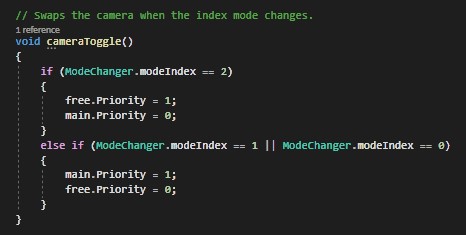
This state was definitely the easiest to implement, but it let me get to know programming hooks built-into Cinemachine. First I added CineMachine's built in 'FreeLook' Camera to my games main camera, and set its priority to 0, while making my original camera's priority 1. As long as both cameras are active, the one with the higher priority value will be used as the active one.
The way I implemented this into actual use is by merely toggling which camera is active in a new script called 'TargetController', which is based on the current value in the 'modeIndex' static value inside the 'ModeChanger' script mentioned prior. The compare value just checks if the value of 'ModeChanger.modeIndex' has changed, and calls the function 'cameraToggle' which does the heavy lifting.
Now the player can look around freely, or be locked onto the target entity depending on which state they are in, and this changes by clicking the 'F' key.
Part Two: Specific Entity Targeting
For specific entity targeting, I started by creating two more game objects, being called 'LeftEntity', and 'RightEntity', and placed empty game objects called 'Locator'('s) inside of them to use as reference points.
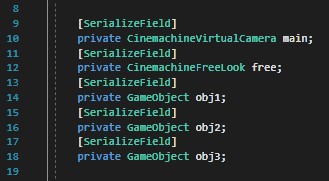
I then added in three serialized object references inside of the 'TargetController' script, which each refer to one of the objects.
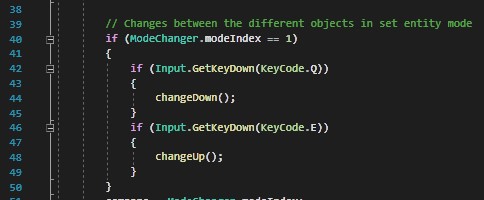
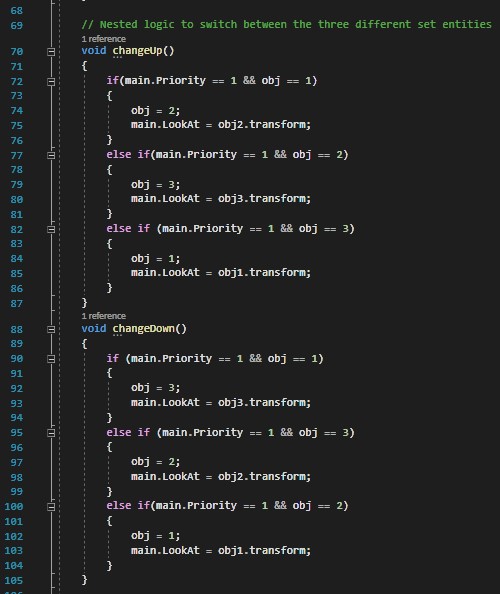
Next I made two functions, that determine which object it's going to look at, one going up, and one going down. (I later found a better way to do this). It should be mentioned this only is active when the current mode is on specific entity targeting.
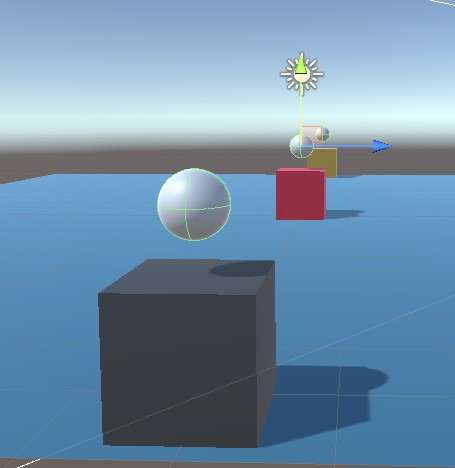
This uses the reference to a CineMachine Virtual Camera, and the built-in logic gameobject variable 'LookAt', to determine which object is considered the 'LookAt' for the camera. And at this point the player can look around at specific game objects they have set well in the proper gamestate using the 'Q' & 'E' keys.
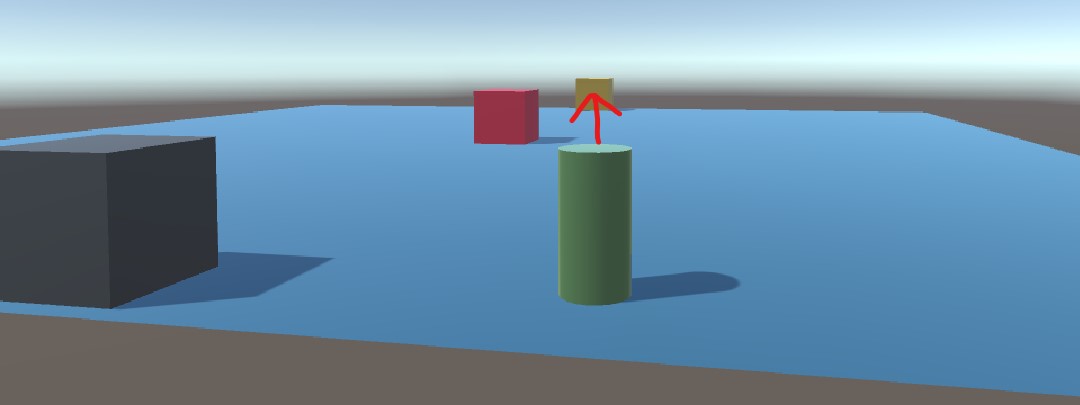
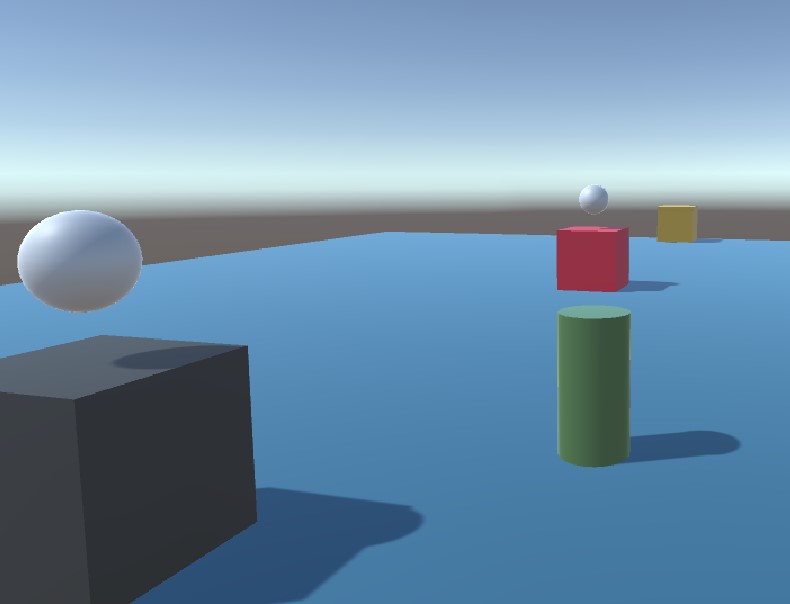
In the above image the player is currently focused on the yellow entity, which is true from any position until they change their target.
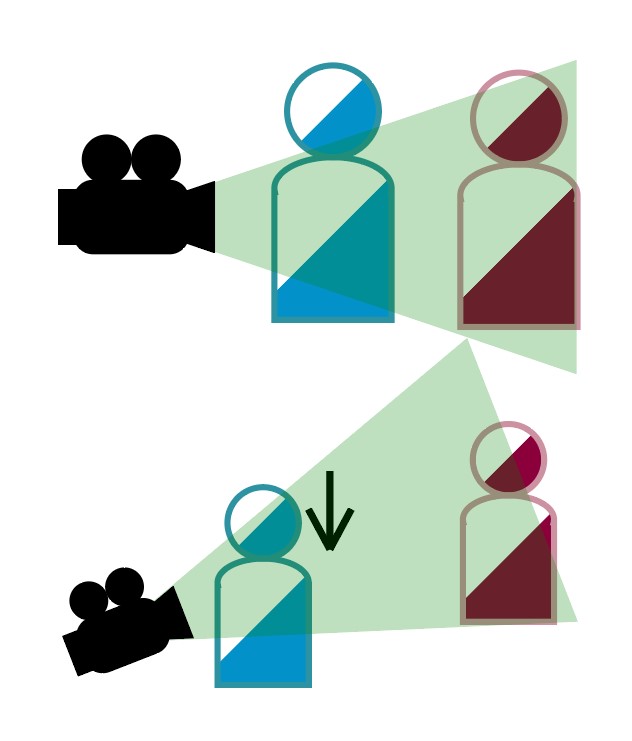
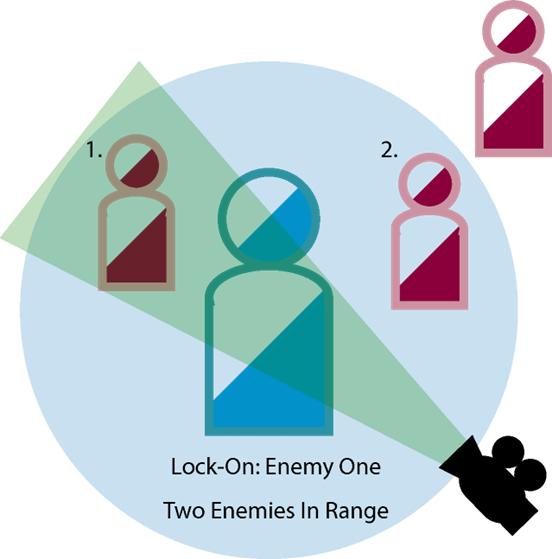
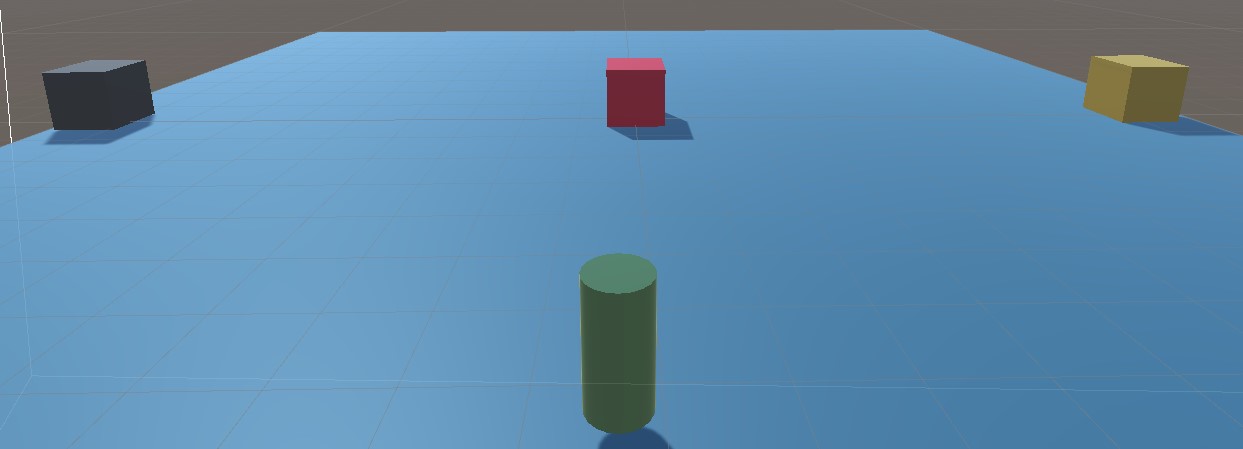
Part Three: Multi-Entity Targeting
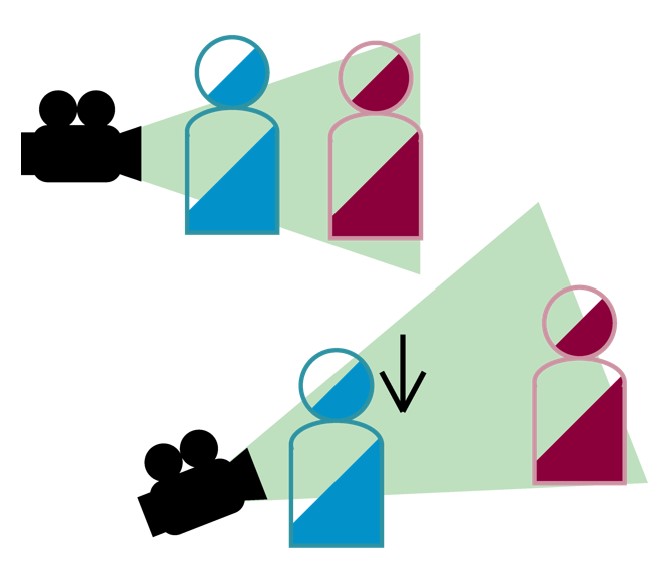
This will be the most complex section, and the one that took me the longest to figure out. The following image represents what I'm trying to do with this part.
Before going into actual code, I knew that I would need a visual indicator of whether the player was in range of an entity or not. Because of this I went ahead and put a sphere inside each enemy entity, and disabled their mesh renderers.
After getting that sorted out, I also created a custom layer called InRange because I knew at this point I would be using an overlap sphere to identify the objects. I then proceeded to make a new script called 'EntityFinder' to implement this last section into.
Once I was done initiating the collider detection, I spent a lot of time and iterations trying to get a properly working array. After doing some research and some thinking, I found that adding the entities found to an array would not be the best choice. There were two options I found that accommodated what I was looking for, which are HashSets, and Lists. I went with the latter because I couldn't find any good explanations around HashSet, and lists seemed very versatile and well documented.
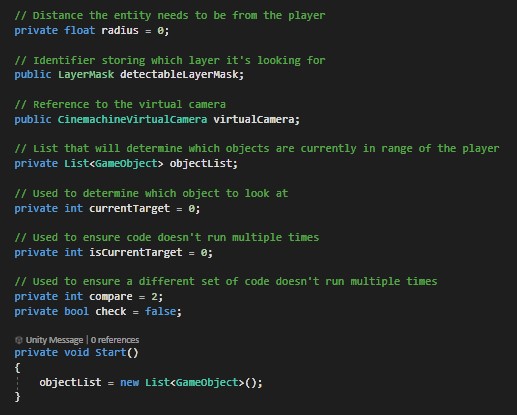
Starting off with the references, I made sure to have the virtual camera, and layer I'll be using close at hand. I then defined the list I'll be using, and two integers to determine what objects the list will be looking at. Lastly, I set two toggles, one a comparison for the current game mode, and the second a boolean ensuring code doesn't run multiple times. I also initiate the list on void start in this screenshot.
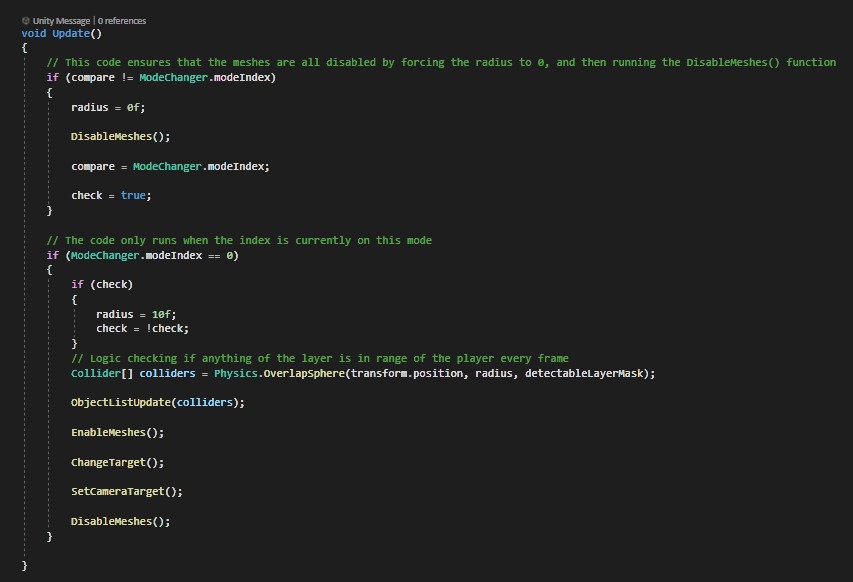
Because this project has a lot of custom functions, I feel that it's best to explain what's happening in update first of all. I have if statements checking the current mode, and if the current mode has changed. If the current mode turns into the one referring to this camera state (0), then it initiates the proper settings and runs each function.
In the first if statement, if the game state changes at all, it will initiate once setting the overlap sphere's radius to 0, ensuring all the mesh renders are disabled, and then set itself to the current modeIndex so it doesn't run until changed again.
In the second if statement, it runs if the current modeIndex is equal to 0, meaning this script is fully active. It then sets the radius to 10 floats, and locks itself ensuring it doesn't run infinitely. The statement then runs a collider check based off of the players position every cycle, and begins to activate the custom functions.
- ObjectListUpdate(colliders);
When object list is called, it takes every object tagged by the OverlapSphere array and adds it to the list once. If the object is already in the list it will be ignored.
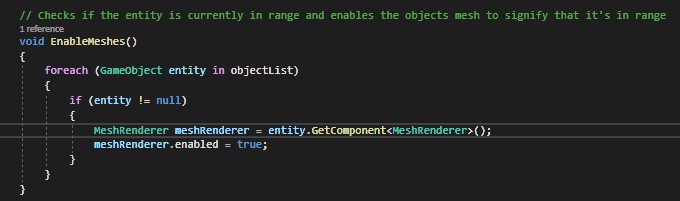
- EnableMeshes();
For each gameobject in the list, as long as they are not null, it finds their meshrenderer and sets it to true.
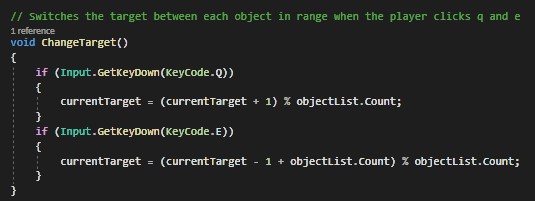
- ChangeTarget();
If the player clicks 'Q' or 'E' the target cycles up and down the current list of game objects, and sets the value of currentTarget equal to its value in the list.
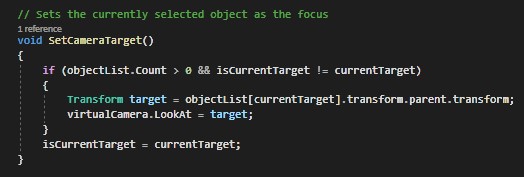
-SetCameraTarget();
This function takes the object that is referenced by the currentValue, and actually sets it as the 'LookAt' for the camera.
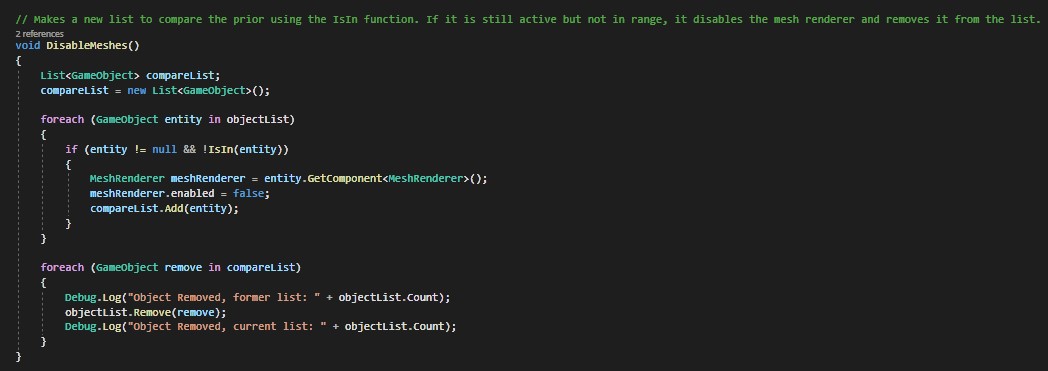
-DisableMeshes();
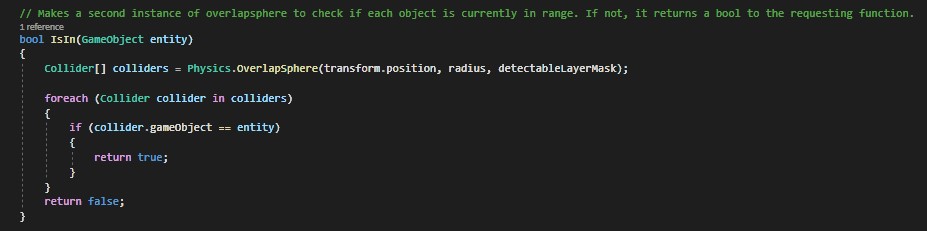
In this function there many important features, it determines if an object is still within range of the player using the custom IsIn() by creating its own overlap sphere for each entity, adding the objects currently in range to a list, and then cross-referencing both lists. If an object is no-longer in the overlap its mesh is disabled, and the object is removed from both lists.
After setting everything up, the player should now be able to switch between all entities in range using the 'Q' and 'E' keys while this state is active.
Conclusion:
In this documentation I went over the intricacies of my project, outlining my thought process, and how I went about implementing three camera state features. The player is able to toggle between all three states using the 'F' key, and while in Set Targeting, and Multi Targeting mode, can use the 'Q' and 'E' keys to switch between all applicable targets.
If you have any questions or feedback, please be sure to leave a message in the comment section below.
Leave a comment
Log in with itch.io to leave a comment.